Just after my son was born I bought a footprint kit at the local mall to make for my mom. Even though the kit only came with 3 things, it was $50. After I got it home and started to get everything set up I realized that there wasn’t much to it.
Now, 4 years later I make my own footprint kits for less than $15. They are the ultimate gift to give to a grandparent because they almost freeze time.
I have put together the steps to make your own foot/handprint at home. While this craft is easy, it does take a bit of patience. But don’t stress if you don’t get it right the first time, you can pop the mold out of the frame and start again.

- a picture frame. It needs to be one that has glass and space between the photo or in this case the mold and the glass. I purchased mine at Walmart it was $8 for 5″ x 7″ and I believe $12 for 8″ x 12″.
- a container of plaster of Paris ($5)
- a brush
- 2 strong elastics
- some sand (2 cups)
- mixing cup and some water
Once you get your frame home take the glass out and the cardboard backing out. Now place either the glass or the cardboard back onto the front of the frame and use the elastics to secure it in place.


When you flip it over there will now be a spot for you to place the sand. If your sand is too dry add a bit of water to it so that it can sit nicely and will be able to hold an impression. Spoon your sand in carefully adding enough that you can make an impression but not too much so that your plaster can’t fit in.

Once the sand is in carefully smooth it out evenly across the frame area. Any ripple or divit will become part of the art and may take away from the foot or handprint.
Now get your child to place their hand or foot in the sand. This is the hardest part for me as toes always look like they are smudged together or parts of the foot don’t make an impression like the arch. Once you get the best impression re-smooth out the sand around the foot/handprint to make sure that it doesn’t look like your child has extra toes or fingers.

Mix the plaster. Follow the directions on the box. Ours was 2 parts plaster to 1 part cold water. A 5″ x 7″ frame is 1 cup plaster to 1/2 cup water and you double that for an 8″ x 10″ frame.

Add the plaster carefully and as quickly as you can without disrupting the sand. I always start with the footprint and then fill in the rest once that is covered. Also be sure to not let the plaster go above the wooden line or the back won’t go back on properly when you are ready to hang it on the wall.

Now let it set a couple of hours. The box of Plaster of Paris says 20-30 minutes but I would say at least 3 or 4 hours to make sure that everything is dry.
To disassemble the art from glass or cardboard just remove the elastics and hold it over the garbage or garden so that sand can be re-used.

Use your brush to gently remove the excess sand from your print. Now let it sit in a dry space overnight and then use your brush again to remove the rest of the sand that has dried and is ready to come off. The photo below had only dried for a few hours so it still appears quite dark. The finished set above was dry for a couple of days so they are much lighter.
To hang re-assemble the cardboard on the back of the frame and re-cycle the glass as it won’t fit on the front with the mold sticking out.

If you are not fond of the results simply pop out the mold and start again. Once you have the frame, the sand and the plaster, it is easy to get another print.
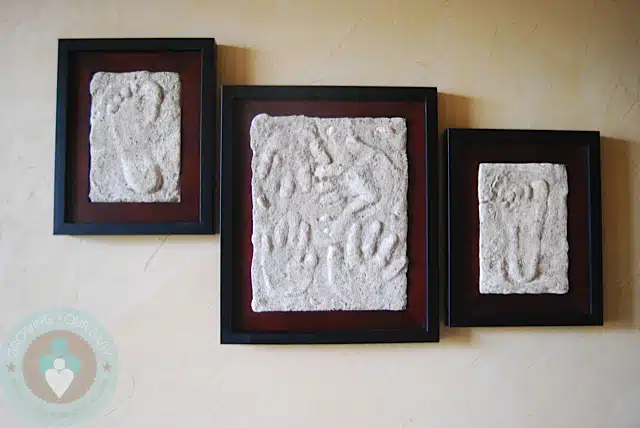
Remember it will never be perfect but that is what makes it so unique. Plus, the sand gives it some contrast and a bit of personality. The foot/handprints shown above are at our front door and we get a lot of compliments on them from friends and family that visit. I am not crafty but find this particular craft easy to do as there aren’t a lot of steps.
Tips:
- If you are planning to do an 8″ x 10″ frame like above you need to move quickly when pouring the plaster as it does tend to dry quickly and there is much more space to cover with a bigger frame.
- Once you think you have the perfect impression you can add some personal items around the print like sea shells or lettered beads with your child’s name.
Related Articles:
- Craft Thursday: Sunflower Treasure Box
- Craft Thursday with Lisa Lopez: Handmade Fairy Tiara and Magical Wand
- Craft Thursday with Lisa Lopez: Baby Sock Finger Puppets
- Craft Thursday With Lisa Lopez: Pounce into spring like a lion!


I loved this craft Lisa, am definitely going to try it this weekend.
This is so, so cool! I can’t wait too try it! I’m going to pin it and share it on my PreschoolPowolPackets Facebook page!
Is there a way to keep this dark. I really like that bottom picture that is dark and sandy.
I wonder if you use a different type of sand? I just grabbed ours from the sandbox out back. It’s not super light now, but showed the impression a little better once it lightened up.
Love this idea! Going to be linking to this in a post that will be going up on my website tomorrow! Can’t wait to try this with my 2.5 year old…yeah, not really a baby, but I never got around to doing this before!
Hi! Love this idea. I plan on using a shadow box. Will I be able to keep the glass in? I’d prefer it for protection. Thanks in advance!